 Setting up a tent -- it sounds simple enough, right? It can be simple, but often there are factors such as weather or missing tent parts that will make you appreciate when things go well. A little preparation ahead of time goes a long way, so simplify! Successful tent setup has three parts:
- At home: set it up and get a ground cloth
- At the campsite: site selection and step-by-step basics of tent setup
- Becoming a tent master: fine-tune your setup, tent care, and pro tips
At home
Setting up the tent at home
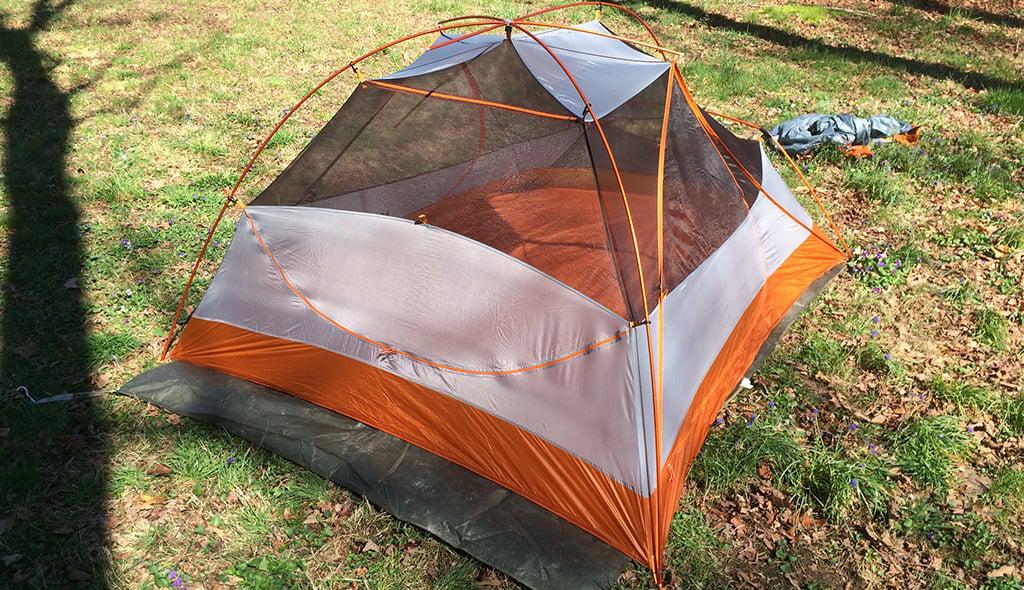
The most important thing you can do pre-trip is to set up the tent at home. This can’t be repeated enough, and is incredibly important for several reasons: 1) you learn how to set up the tent 2) you make sure all the parts are there 3) you learn about your specific tent. Setting up your tent pre-trip also makes you consider your ground cloth.
Ground cloth or footprint
A ground cloth should be used every time you camp, and it should go under your tent, not inside it. The ground cloth protects your tent investment and keeps you drier. If you did not purchase one that matches your tent shape (called a footprint), you can make one out of plastic sheeting or Tyvek housewrap. Remember to tuck excess material under the tent to prevent water from pooling. 
Pack extra nylon cord
Many tents come with no nylon cord, or only a little. Staying dry sometimes requires extra nylon cord and it’s cheap enough, light enough, and versatile enough that you can’t afford not to pack extra. Two 50-foot lengths that you can cut with your knife is a good idea. You may use it all if you are camping in the snow, in the rain, or on the beach. 
At a campsite
Site selection
Picking the right campsite can make it a camping trip to remember instead of a camping trip you want to forget. When figuring out where to camp, make WHERE an acronym for things to keep in mind: Water, Hazards, Environment, Regulations, Extra-comfy. Water - you know it runs downhill. Look at the micro-topography. Don’t stay in a valley. Hazards - be sure there are no dead trees or limbs overhead. If a storm comes, your site should offer some level of protection. Don’t stay on ridges exposed to lightning. Are you protected from the elements? Are you camping below a high water line? Environment - consider Leave No Trace ethics and do not damage ecologically sensitive areas. If there is an obvious spot where people have camped before, you may want to use it rather than damaging a new area. And don’t go overboard when moving rocks or branches for one night of sleep. Regulations - know the rules for where you camp and plan ahead. In Denali, for example, you are not permitted to camp within view of the road. Extra-comfy - ideally, your spot should be flat and free of anything that will poke a hole in your tent floor or ground cloth. Leaf litter can be quite soft, but if you gather any, disperse it when you leave.
How to set up a tent
 The process of setting up most modern tents boils down to a few basic steps. Below are generalized steps, since most tents have similar parts: tent body, rain fly, poles, ground cloth, stakes, and nylon cording.
- Organize all the parts on the ground or on the ground cloth.
- Assemble the poles with care, noting any differences in length or color, which may indicate that a given pole fits a specific corner of the tent (as opposed to interchangeable corners).
- Spread out the tent body on the ground cloth and note any differences in colors at the corners. Many modern tents color code the poles with corresponding tent corners. If your tent has pole sleeves, feed the poles through the sleeves.

- Attach the pole ends to the tent by starting at one corner and working your way around the tent. Then, clip the body of the tent to the poles. If you have trouble with the last clip, change the order of clipping: detach a few nearby clips to create some slack and try again.
- If necessary, put on the rainfly and adjust the tension in the corners. In hot weather, you may prefer to sleep without the rainfly.

- Before staking down your assembled tent, determine which way you want the door to face, and place the ground cloth down in the desired location and direction. Place the tent in the proper position on the ground cloth, then stake the tent to the ground at the corners and stake out the fly. Be sure to bring extra nylon cord and appropriate anchors for the terrain. The section below has detailed information on guylines.
Becoming a tent master
Guylines
 Remember all that extra nylon cord you brought? You will need it for guylines that help keep you dry when camping in the rain and added strength. The additional guyout points on the tent rainfly work best when pulled away from the tent body evenly all the way around. If you use extra guylines, you’ll need extra stakes. Trees and rocks can work if stakes aren’t an option. Brushing up on knots before you head out is always a good idea; the bowline and trucker’s hitch are important to remember. When camping in the snow or sand, you may need to make anchors yourself. Wrap nylon cord around a stick or other object with surface area and pack it in place. Stack rocks on top if necessary. Fabric snow/sand anchors are ideal and may be a good investment if you regularly are camping in the snow or sand.
Taking your tent down and tent care
Tents can be expensive, so take care of them.
- Clean out your tent before packing it up. Debris such as leaves, twigs, or small rocks can damage a tent that is stuffed into a pack. Before you take your tent down, unstake it and open all the doors. Gently upend the tent so the door faces the ground and shake the debris out. You might be able to carefully pick up and shake out your lightweight backpacking tent.
- Allow the tent to air out in the morning, if possible. Shake off and dry off excess dew or rain before stashing it in your pack or car.
- Stuff the tent, don’t fold! This one is tricky for the super organized (Type A) camper, but folding the tent the same way can break down layers on the creases. Stuffing distributes the wear evenly.
- To avoid getting mildew, make sure your tent is completely dry before you store it for a long period of time at home. Reassemble it to dry out fully if necessary.
- If you need to clean your tent, a sponge bath is the best option. Use a soft sponge and water. Do not machine wash a tent. As with most gear, check the manufacturer’s label for specific care instructions.
Pro tips
- For backpacking, remember that the first thing that goes into your pack is the last thing out. In rainy weather, keep your rain tarp close to the top of your pack with your tent ground cloth right under that. After you set up your rain tarp, you can spread out on your ground cloth and get organized. Check out our complete packing list and if you’re new to backpacking, our beginner’s guide.
- Carry another 50 foot length of nylon cord, just in case your partner forgets theirs.
- When setting up your tent in the wind, use extra guylines and hold on tightly.
- When setting up a tent by yourself, experiment with pole setup. It might be better to attach one pole at both ends before moving on to the second pole, or to attach two pole ends and then move to the opposite end of the tent.
Novice or pro, car camper or backpacker: Everyone needs a shelter. Following these guidelines will reduce your stress and increase your fun. Set it up at home first, know WHERE to pitch your tent, and soon you’ll become a tent master. See you at camp!


